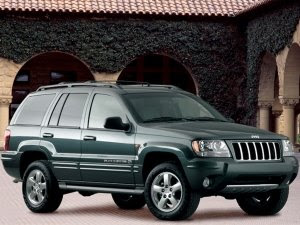
 Jeep Grand Cherokee (1993-1999 ) is calculated on strong by spirit, the strong people tempered on travel. It leaves nobody indifferent. He equally confidently feels on wood roads and lines with firm coverings. Ease in the steering, the interior thought over to trifles, smoothness of a course should cause admiration as the driver, and passengers. It is the car for those who appreciates the present force, true friendship and command spirit - with it on a shoulder overcoming of any obstacles and obstacle.Jeep Grand Cherokee - present Not for road car combining the best technical achievements of Europe and traditional American design. Engineers DaimlerChrysler have created this masterpiece, making use of 60-year-old experience of creation of all-wheel drive cars.
Jeep wiring diagram engages 12 In system of an electrical equipment about grounding on a negative pole. A food of all lighting instruments and electric units is carried out from the battery of lead-acid type recharged from the alternator.
There comes the moment when there is a reason, that you Jeep is not started. You look wiring diagram- it an order. The reason - the discharged accumulator. It is necessary a starting engine operation from the auxiliary power supply. Also at performance of any works on repair and service of components of wiring diagram it is necessary to unhook preliminary without fail a negative lead from the battery (or to remove the battery) in order to avoid electrotrauma and-or ignition reception.
At a starting engine operation from the auxiliary battery it is necessary to remember necessity of performance of following requirements:
* Before connection of the auxiliary battery make sure, that ignition is switched off (a key will turn in position OFF).
* Make sure, that all electrical equipment of the car (lighting instruments, a heater, window wipers, etc.) is switched off.
* Necessarily put on goggles.
* Make sure, that the auxiliary battery on an output voltage corresponds established on your car.
* If start is made from the battery established on other car, track, that between cars there were no things in common!
* Make sure, transmission is established on neutral drive , or in position “Р” (Parking) .
* If the auxiliary battery concerns type subject to service, remove from it ventilating covers and cover bores with rags.
Assemble such wiring diagram.
Connect a red wire from the complete set for a starting engine operation from an auxiliary source between positive (+) plugs of both batteries. Then connect the second (black) wire from the complete set at first to negative (-) the plug of the auxiliary battery, and then to well earthed point on your car (such as a bolt or a bracket on the engine block, whenever possible within distance in 45 sm from the battery). Check up wiring diagram. Make sure, that wires do not touch moving components of an impellent compartment (such as fan baffles, drivebelts, etc.).
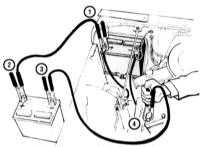
Wiring diagram of a starting engine operation from the auxiliary power supply.
Starting engine operation from auxiliary power supply Jeep Grand Cherokee Connect wires from the complete set for start of the car from the auxiliary power supply as it should be shown on wiring diagram (Pay attention, that the negative lead of the auxiliary battery is not connected to a negative side of the sat down battery).
Start the engine from the auxiliary battery, then, having left its working on single turns, engage the motor of the fan of a heater (for the maximum speed) or a defroster of glass for smoothing of peaks of pressure which can arise at unhooking of wires (do not engage lighting instruments since considerable jumps of pressure can lead lamps to burn down). Unhook wires, operating as it should be the return to an order of their connection, in conformity with wiring diagram.
Read more...
---------------------------------------------------------------------------------------------------


No comments:
Post a Comment
Note: Only a member of this blog may post a comment.